FAUX BARN WOOD WALL

Supplies:
8 x 10 Sheets of Underlayment ($11.99 per sheet, I used 4 sheets and had left over.)
White Vinegar
Fine Steel Wool
Chop Saw
Air Compressor
Nail Gun
Nails
I love the look of barn wood walls, but there are two things that made me hesitant to do one. First, the price, even the knock-offs or the peel-and-stick was more than I wanted to spend. Second, its trendy so I know in 10 years I probably wont love it and will be wanting to rip it off my wall. With these two things in mind I did some research and came up with a plan. I used the 4x8 sheets of underlayment that many people are using to make ship lap. It is very inexpensive and has a wood veneer I knew I could stain. Also, I could get the boards more uniform than actual barn wood making them easier to install to my wall. Another plus was the weight of each board is way less than making a barn wood wall out of fence pickets or actual barn wood.
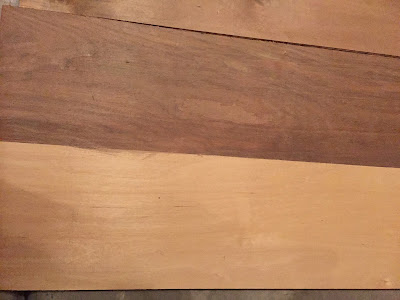
| Birch Underlayment. |
Here is a link to the underlayment:
I purchased it at Home Depot and I batted my eyelashes at the kindly old man so he would cut it for me. I had him rip it in 5.5 inch strips with the grain of the wood. So I ended up with boards that were 5.5 inches by 8 feet.
I followed this link to get an idea of how this would go: http://www.plumprettydecoranddesign.com/blog/2016/3/15/diyfauxshiplapwall
Staining:
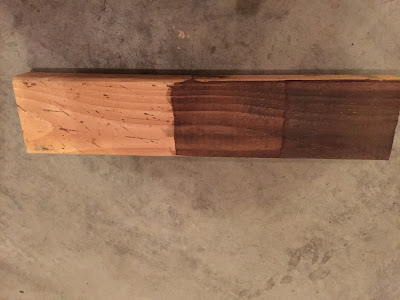
Next, I made a DIY stain. This stuff is magical and so fun to work with. It is just vinegar and steel wool. You can use any kind of vinegar, white makes it more of a warmer color and apple cider gives you a cooler color. Both colors end up in the gray family. I took a quart jar, pulled apart a pad of fine steel wool and filled the jar full of white vinegar and the steel wool. I left it overnight expecting some cool science in my kitchen and I was so disappointed in the morning! The vinegar was still clear and it looked like nothing happened besides a few bubbles on the wool. I found an old 2 x 4 and slapped some on it. Then, MAGIC! It oxidized the wood and turned it a beautiful shade of brown/gray!
I used this link to get an idea of how this would work:
https://dengarden.com/interior-design/DIY-Decorating-Staining-Wood-with-Vinegar
I slapped a few coats of this on my boards and waited for the magic. It turned out more gray than the pine 2 x 4, but that is what I wanted! I really feel like you could stop there and slap those gorgeous babies on your wall and have a nice uniform colored wood planked wall. But, I'm difficult and I wanted BARN wood so I had to add some interest to my wood.
 |
| Top boards are stained. |
Dry Brushing:
Dry brushing is exactly what it sounds like. I took an old scraggly paint brush, watered down some dark brown paint barely dipped my brush in. You want a pretty dry brush and then just lightly rake it over the boards in a few areas. Some boards got more than others because I wanted variety! I followed the dark brown up with white using the same technique. This part can be scary, but the purpose is to not have it look perfect. My OCD struggles with that concept.
This was my inspiration on dry brushing, but I wanted to also do the brown for more variation:
http://lovegrowswild.com/2014/01/dry-brushing-paint-technique/
http://lovegrowswild.com/2014/01/dry-brushing-paint-technique/
Installing:
We installed just like the ship lap tutorials you have seen. We used dimes to space our boards and 3/4 inch nails.
Here is a link of a ship lap tutorial I used:
http://hookedonhouses.net/2015/03/19/how-to-hang-fake-shiplap-paneling/
http://hookedonhouses.net/2015/03/19/how-to-hang-fake-shiplap-paneling/
Before & After:
 |
| Before |
 |
| After |


No comments:
Post a Comment